- Hardware as I mentioned is a bitsfrombytes lasercut kit, put together with hardware as available in the US. Had a lot of fun tracking down all the metric parts over here, but I didn't want to go through the pain that I was sure would happen as a result of holes not quite fitting bolts, etc. McMaster-Carr is very happy with me. I ordered my steel rods from MSC Industrial Supply, they came without any problems (mscdirect.com).
- Electronics came from a complete generation-2 kit from rrrf. Arduino kit came from Modern Device Company (moderndevice.com). It's a bare bones board kit, rev. D, which worked fine. Only problem is that the smaller footprint of the bare bones has a different footprint than the diecimilla, so the arduino breakout shield I got from RRRF didn't fit. Bit of a PITA, but I got it to work by soldering jumpers in place.
- Software as working now is gcode firmware being driven by send.py from the skeinforge package, sourcing from AoI and converted to gcode also by skeinforge.
- Extruder mods- I had to sharpen the threads of the drive screw in the extruder to get it to grip at all, even after that I had problems until I removed the internal plate which was holding the pressure bearing from getting closer to the filament in the extruder head. I also adjusted the angle at which the extruder drive screw subassembly joined to the rest of the extruder so that the drive screw had a slight angle towards the filament at the bottom. With all of these I've been able to extrude HDPE reliably at temperature 240-250C and extruder speed 200-210.
- Bed selection- I couldn't get the melted HDPE to bond to anything, I tried: plexiglass; the lasercut acrylic material; plywood; then had a little bit of luck with duct tape on sheet of thick paper. The latter worked except that the paper/tape combo would curl right up and become pretty useless. I was able to get some printing done using 12" square sheets of plywood with a covering of duct tape. It has been peeling up if I don't have any cooling on it per layer, but the extrudate sticks well straight out of the barrel.
 To get into the trials and tribulations I went through:
- I had a ton of trouble with the host software. Actually, to be accurate I just had one problem and I'm nor sure if it was the host software or the arduino SNAP firmware. Within about one minute or 30 movements of the extruder head, the arduino would lock up and not respond anymore until after I reset it. I tried to separate arduinos, same problem. I switched to using the gcode firmware and skeinforge toolchain and haven't had a problem like this since.
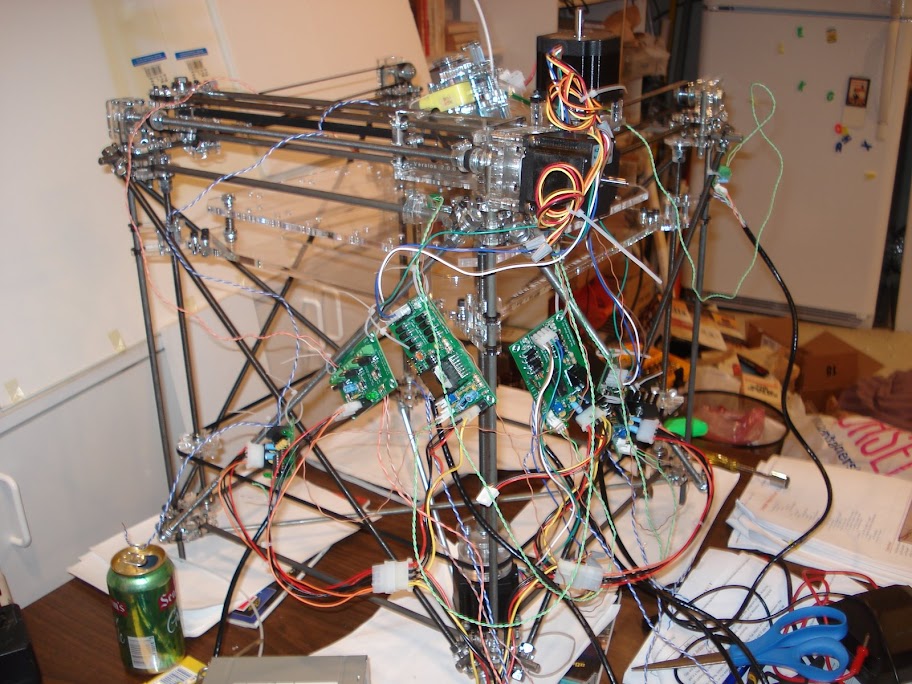
- I'm using HDPE (which seemed like a good idea when I started out, but now I'm not so sure). I ordered from Judy@ Village plastics (villageplastics@sbcglobal.net)- she was very friendly and helpful. Problems were with shrinkage- notice how far the raft pulled up in the right foreground. The shrinkage of the HDPE has been a huge problem. I tried using the cooling fan mounted to the extruder head, but this would cause the HDPE to start cooling and delaminate from the bed. I just tried to turn the cooling fan on each side of the raft as the head was at the other side as well as during a 30 second rest between each layer, and that seemed to work much better. The version of skeinforge doesn't have this as an option in the cool screen but I modified raft.py to include "interimstart.txt" and "interimend.txt" and the beginning and end of the temperature loop periods and set those up to include M106/M107. Hopefully that'll work better.
- On the building side, the lasercut parts are finicky. The acrylic is really fragile, I count myself lucky to only have broken half a dozen pieces. Luckily I have a big tube of superglue which bonds with the acrylic really well so I've been able to fix the parts right up (when I have all the pieces). I'm very tired of tightening screws all the time, I think that somebody needs to come up with a better way of joining the stepper motor drive shafts to the rods they're driving.
 See my picasaweb site for more pictures along the way.
I'll call that it for now, but I just wanted to post my experiences and say thanks to all the folks who helped me get this far. Adrian Bower of course, Zach at RRRF for making the electronics kits available, Ian & co at bitsfrombytes for the lasercut parts, Enrique for skeinforge, and everyone who contributed to all of those.
All the best,
Adam
6 comments:
Nice work only thing I can see that could be a problem that I ran into. I mounted my circuit board the same way to my restrap using zip ties. One day I was moving it around cleaning up around the restrap. Well anyways in the moving one of the board move so it was touching the steal rods. It shorted and fried the stepper driver board. Not saying you cant mount them on the restrap just make sure they are insulated. You could try covering the back of the boards with electrical tape. Anyways good luck one the printing.
Yeah, after I took the picture in the post I went through and put clear plastic backings on each of the boards. Basically I cut CD cases to size, drilled holes in the corners, and mounted the boards to those with 3mm bolts. Then I replaced most of the zip ties with plastic hose clamps which are kept closed with the same bolts that hold the backing on. Much less risk of short circuits!
Hi Hahn,
Pretty nice work man!
We see to both be having some trouble with the extruder though.
I had a broken moulded extruder. It broke because of too much pressure deforming the PTFE rod. This moulded extruder was also from BfB, but they don't make it anymore.
Anyway, I ordered a new one in acrylic. It seemed more rigid but I still have the problem that the pressure gets too high. I can't really push the fillament (HDPE or ABS) through by hand when I've got a separate heater barrel heated up.
The fully assembled thing either has gears skipping or the fillament stays where it is. When the gears skip, I've probably over-tightened the tensioner that pushes the fillament to the drive screw. When I loosen it a bit, the fillament stays where it is. Frustrating... the extruder really seems to be the hardest part. It is also essential for getting some actual printing done...
Best regards,
Erik de Bruijn
Erik's RepRap blog
You used send.py! I wrote send.py! It's a stupid little hack, but you have no idea how gratifying it is to see somebody use it and actually print something.
I'm still working out bugs. I think my temp sensor board is working, but software bugs prevent verification of that for now...
Ahahn,
Looking good, particularly as you are using HDPE, which is the hardest to get good results with.
Erik,
I am surprised you can't push the filament through by hand. That reminds me of the problem I had when I tried to use stainless steel instead of PTFE.
With the original extruder design it is easy to push the filament by hand with a pair of pliers for grip.
Post a Comment